iOS 7では、「AVSpeech Synthesizer」という音声読み上げ機能が新たに搭載されました。その機能を使ってiPhoneにお喋りさせるノウハウについて、ヤフーのiOS Developer千葉俊輝さんに寄稿をいただきました。
iOS 7の新機能、音声読み上げ機能について
今回は、iOS 7で新たに追加された AVSpeech Synthesizer について説明したいと思います。
AVSpeech Synthesizer とは
iOSデバイス上のテキストから合成音声を生成し、発話の進行を制御、状態の監視をすることでiPhoneがお喋りできるようになります。
AVSpeech Synthesizer のメソッドとプロパティ
/* AVSpeech Synthesizerのメソッド */
// 再生、キューに追加
- (void)speakUtterance:(AVSpeechUtterance *)utterance;
// 指定された定数で再生を停止
- (BOOL)stopSpeakingAtBoundary:(AVSpeechBoundary)boundary;
// 指定された定数で再生を一時停止
- (BOOL)pauseSpeakingAtBoundary:(AVSpeechBoundary)boundary;
// 再生を再開
- (BOOL)continueSpeaking;

/* AVSpeech Synthesizerのプロパティ */
// delegate
@property(nonatomic, assign) id<AVSpeechSynthesizerDelegate> delegate;
// 再生されているか
@property(nonatomic, readonly, getter=isSpeaking) BOOL speaking;
// 停止しているか
@property(nonatomic, readonly, getter=isPaused) BOOL paused;

/* AVSpeech Synthesizerの定数 */
typedef enum : NSInteger {
   AVSpeechBoundaryImmediate,//直ちに一時停止、停止
   AVSpeechBoundaryWord //現在再生している単語の後に一時停止、停止
} AVSpeechBoundary;
発話させるために、まずは再生したいテキストを含んだ AVSpeechUtterance のインスタンスを作成する必要があります。
AVSpeechUtterance とは
AVSpeechUtterance のプロパティには読み上げ時の音声指定、スピード、ボリューム、声のピッチ、再生までの待ち時間、再生終了後の待ち時間などが設定できます。
- 音声は AVSpeechSynthesisVoice のインスタンスを指定、使用できる音声取得方法は下記メソッド一覧に記述。
- スピードは0から1で指定。
- ボリュームは0から1で指定。
- 声のピッチは0.5から2で指定。
AVSpeechUtterance , AVSpeechSynthesisVoice のメソッドとプロパティ
/* AVSpeechUtteranceのメソッド */
// 再生するテキスト設定
+ (AVSpeechUtterance *)speechUtteranceWithString:(NSString *)string;
// オブジェクトの初期化と再生するテキスト設定
- (AVSpeechUtterance *)initWithString:(NSString *)string;

/* AVSpeechUtteranceのプロパティ*/
@property(nonatomic, retain) AVSpeechSynthesisVoice *voice;
@property(nonatomic, readonly) NSString *speechString; //再生テキスト
@property(nonatomic) float rate;             // はやさ
@property(nonatomic) float pitchMultiplier;  // 声のピッチ [0.5 - 2] Default = 1
@property(nonatomic) float volume;           // 大きさ [0-1] Default = 1
@property(nonatomic) NSTimeInterval preUtteranceDelay;    // 開始までの待機時間 Default is 0.0
@property(nonatomic) NSTimeInterval postUtteranceDelay;   // 終了後の待機時間 Default is 0.0

/* AVSpeechSynthesisVoiceのメソッド */
// 再生できる音声一覧
+ (NSArray *)speechVoices;
// 設定されている言語コード
+ (NSString *)currentLanguageCode;
// 音声の設定
+ (AVSpeechSynthesisVoice *)voiceWithLanguage:(NSString *)language;

/* AVSpeechSynthesisVoiceのプロパティ*/
// 設定音声
@property(nonatomic, readonly) NSString *language;
音声の読み上げ
AVSpeech Synthesizer の speakUtterance メソッドに AVSpeechUtterance のインスタンス与えることで発話が開始されます。
AVSpeech Synthesizer は AVSpeechUtterance のインスタンスをキューで管理し、キューに追加した順番で再生されます。
AVSpeech Synthesizer が発話されていない場合は直ちに再生されます(待機時間を設定してる場合は待機時間後に発話が開始)。
すでに発話されている場合は AVSpeechUtterance のインスタンスをキューに追加します。
制御
発話開始後、音声を一時停止や停止する制御ができます。
Delegateを設定すると再生状態を監視できます。
AVSpeechSynthesizerDelegate のメソッド
/* AVSpeechSynthesizerDelegateのメソッド */
// 再生が始まった時
- (void)speechSynthesizer:(AVSpeechSynthesizer *)synthesizer didStartSpeechUtterance:(AVSpeechUtterance *)utterance;
// 再生が終わった時
- (void)speechSynthesizer:(AVSpeechSynthesizer *)synthesizer didFinishSpeechUtterance:(AVSpeechUtterance *)utterance;
// 再生が一時停止した時
- (void)speechSynthesizer:(AVSpeechSynthesizer *)synthesizer didPauseSpeechUtterance:(AVSpeechUtterance *)utterance;
// 再生が再開されたとき
- (void)speechSynthesizer:(AVSpeechSynthesizer *)synthesizer didContinueSpeechUtterance:(AVSpeechUtterance *)utterance;
// 読み上げが停止した時
- (void)speechSynthesizer:(AVSpeechSynthesizer *)synthesizer didCancelSpeechUtterance:(AVSpeechUtterance *)utterance;
// 再生中のテキスト範囲
- (void)speechSynthesizer:(AVSpeechSynthesizer *)synthesizer willSpeakRangeOfSpeechString:(NSRange)characterRange utterance:(AVSpeechUtterance *)utterance;
iPhoneにお喋りしてもらう
1.AVFoundation.frameworkをimport
ProjectのLinked Frameworks and Libraries にAVFoundation.frameworkを追加します。


次に
- 音声読み上げをしたいクラスで、
#import <AVFoundation/AVFoundation.h>このコードを追加 - AVSpeechSynthesizerDelegate プロトコルの採用
- AVSpeechSynthesizer のプロパティを作成
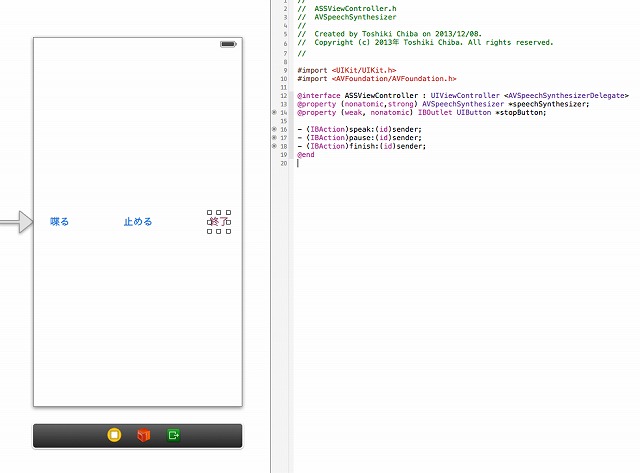
宣言部
//
//  ASSViewController.h
//  AVSpeechSynthesizer
//
//  Created by Toshiki Chiba on 2013/12/08.
//  Copyright (c) 2013年 Toshiki Chiba. All rights reserved.
//

#import <UIKit/UIKit.h>
#import <AVFoundation/AVFoundation.h>

@interface ASSViewController : UIViewController <AVSpeechSynthesizerDelegate> // プロトコルの採用
@property (nonatomic,strong) AVSpeechSynthesizer *speechSynthesizer; // プロパティ作成
@end
2.AVSpeechSynthesizer のインスタンスを作成し、デリゲートを設定
実装部
//
//  ASSViewController.m
//  AVSpeechSynthesizer
//
//  Created by Toshiki Chiba on 2013/12/08.
//  Copyright (c) 2013年 Toshiki Chiba. All rights reserved.
//

#import "ASSViewController.h"

@interface ASSViewController ()

@end

@implementation ASSViewController

- (void)viewDidLoad
{
    [super viewDidLoad];
 // Do any additional setup after loading the view, typically from a nib.
    // initialize AVSpeechSynthesizer インスタンスを作成し、デリゲートを設定する
    _speechSynthesizer = [[AVSpeechSynthesizer alloc] init];
    _speechSynthesizer.delegate = self;
}

- (void)didReceiveMemoryWarning
{
    [super didReceiveMemoryWarning];
    // Dispose of any resources that can be recreated.
}

@end
3.再生ボタン、一時停止ボタン、終了ボタンを作る
- Storyboardを選択し、UIButtonをDrag&Dropで3つ作ります。
- ボタンのタイトルもそれぞれ設定します。
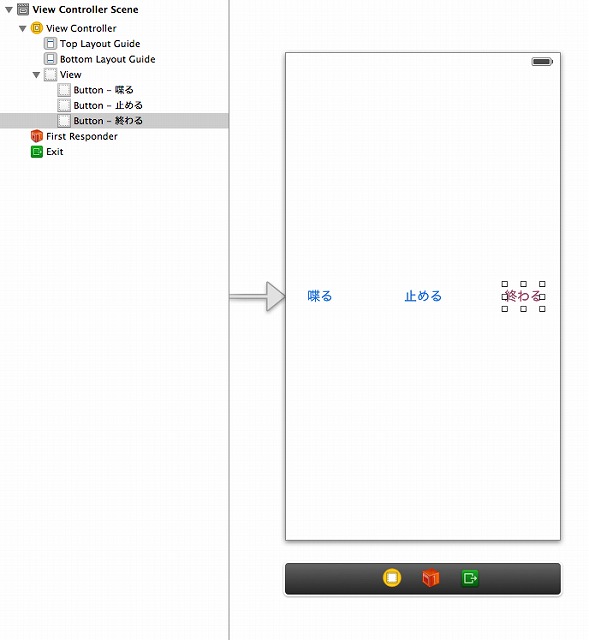
- Buttonのアクションを下記のように定義します
- 喋るボタンを押すとspeak
- 止めるボタンを押すとpause
- 終わるボタンを押すとfinish
4.再生したいタイミングで、 AVSpeechSynthesizer の speakUtterance: に AVSpeechUtterance のインスタンスを与えると再生が開始
- (IBAction)speak:(id)sender {
    // AVSpeechUtteranceに再生テキストを設定し、インスタンス作成
    AVSpeechUtterance *utterance = [AVSpeechUtterance speechUtteranceWithString:@"Yahoo! JAPAN"];
    // 英語に設定し、AVSpeechSynthesisVoiceのインスタンス作成
    AVSpeechSynthesisVoice *voice = [AVSpeechSynthesisVoice voiceWithLanguage:@"en-US"];
    // AVSpeechSynthesisVoiceをAVSpeechUtterance.voiceに指定。
    utterance.voice =  voice;
    // デフォルトは早すぎるので、聞き取りやすいように低い数値を入れる
    utterance.rate = 0.2;
    // ピッチを低くすることで男性ぽい声にする
    utterance.pitchMultiplier = 0.5;
    // 少しだけ発話前にためを作りたいので、Delayに値を設定
  utterance.preUtteranceDelay = 0.2f;
    // 再生開始
    [self.speechSynthesizer speakUtterance:utterance];
}
再生はここまでの処理でできます。
もう一手間加えると、もっと便利に使えます。
5.再生の制御
- (IBAction)pause:(id)sender {
    // 停止していたら再開、停止していなかったら停止
    self.speechSynthesizer.paused?
    [self.speechSynthesizer continueSpeaking]:
    [self.speechSynthesizer pauseSpeakingAtBoundary:AVSpeechBoundaryImmediate];
}

- (IBAction)finish:(id)sender {
    // 直ちに停止
    [self.speechSynthesizer stopSpeakingAtBoundary:AVSpeechBoundaryImmediate];
}
ここまでの処理で再生、停止、終了の制御ができるようになります。
喋るボタンを押すとネイティブな発音で 「Yahoo! JAPAN」 とiPhoneがお話してくれます。
おまけ
6.再生状況に応じて処理を付加したい場合
#pragma mark - Private Methods
-(void)p_setUpPauseButton {
    // 再生状況でボタンのタイトルを変える
    NSString *buttonTitle = self.speechSynthesizer.paused? @"始める":@"止める";
    [self.pauseButton setTitle:buttonTitle forState:UIControlStateNormal];
}

-(void)p_initilaizeButtonAndText {
    // ボタンのタイトルを初期化する
    [self.pauseButton setTitle:@"止める" forState:UIControlStateNormal];
}

#pragma mark - AVSpeechSynthesizerDelegate

- (void)speechSynthesizer:(AVSpeechSynthesizer *)synthesizer didStartSpeechUtterance:(AVSpeechUtterance *)utterance{
    NSLog(@"読み上げを開始しました");
}

- (void)speechSynthesizer:(AVSpeechSynthesizer *)synthesizer didFinishSpeechUtterance:(AVSpeechUtterance *)utterance{
    [self p_initilaizeButtonAndText];
    NSLog(@"読み上げを終了しました");
}

- (void)speechSynthesizer:(AVSpeechSynthesizer *)synthesizer didPauseSpeechUtterance:(AVSpeechUtterance *)utterance{
    [self p_setUpPauseButton];
    NSLog(@"読み上げを一時停止しました");
}

- (void)speechSynthesizer:(AVSpeechSynthesizer *)synthesizer didContinueSpeechUtterance:(AVSpeechUtterance *)utterance{
    [self p_setUpPauseButton];
    NSLog(@"読み上げを再開しました");
}

- (void)speechSynthesizer:(AVSpeechSynthesizer *)synthesizer didCancelSpeechUtterance:(AVSpeechUtterance *)utterance{
    [self p_initilaizeButtonAndText];
    NSLog(@"読み上げを停止しました");
}
このように再生状況によってボタンの文字を変えることができます。
音声読み上げ機能の注意事項
- iPhoneのマナーモードが解除されないと再生されません。
- 日本語の再生の場合、意図しない位置で区切られてしまい、精度があまりよくありません。
最後に
iPhoneではSiriのように発話する機能がありませんでした。iOS 7からの新機能で音声合成機能が使えるようになり、これからのアプリの可能性を広げていく機能だと私は思います。
Yahoo! JAPAN Tech Blogでは、iOS 7勉強会に関する様々な資料を公開しています。ぜひご覧ください。
 寄稿者プロフィール 千葉俊輝
ヤフー株式会社 iOS Developer。
日本最大のポータルサイト「Yahoo! JAPAN」のiOSアプリ開発を行う。
※本記事は「CodeIQ MAGAZINE」掲載の記事を転載しております。
8,568通り、あなたはどのタイプ?

グッドポイント診断で、あなたの隠れた強みを診断してみましょう。
診断結果は8,568通り。あなたはどのタイプ?